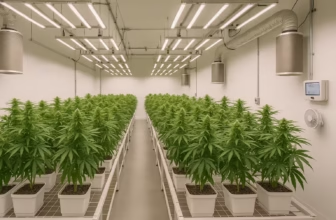
Setting up an indoor grow room is the first real step toward becoming a self-sufficient cannabis cultivator. When you bring your plants inside, you get full control over every variable — light intensity, airflow, temperature, humidity, CO₂ levels, and odor management — the exact things that make or break your harvest. Unlike outdoor grows, an indoor grow room gives you a stable, controlled environment where you can dial in the perfect climate for seedlings, vegging plants, and heavy-budding flowers.
Whether you’re converting a spare room, basement, closet, garage, or a small 3×3 grow space, the goal is the same: create an efficient indoor cultivation zone that maximizes yields without wasting electricity or space. With the right setup — LED grow lights, inline exhaust fans, carbon filters, oscillating fans, environmental controllers, reflective walls, and proper insulation — you can grow top-shelf cannabis year-round.
An indoor grow room is a controlled environment designed for growing cannabis inside your home using proper lighting, ventilation, temperature, and humidity management. A well-designed grow room helps ensure healthy plants, faster growth, fewer pests, stronger yields, and full climate control for year-round indoor cultivation.
In this guide, we’re going deep into how to design the perfect indoor grow room, from air circulation patterns to light placement, from VPD (Vapor Pressure Deficit) to temperature-humidity balance, and from stealth odor control to beginner grow room mistakes to avoid. If you want bigger buds, stronger terpenes, and consistent indoor harvests, you’re in the right place.
What Is an Indoor Grow Room? (Definition + Purpose)
An indoor grow room is a fully controlled cannabis cultivation space built inside your home where you manage light, airflow, humidity, temperature, and CO₂ to give your plants the perfect environment from seedling to harvest. Unlike growing outdoors — where weather, pests, and seasons decide everything — an indoor grow room puts you in control of every variable that affects growth and yield.
For many growers, an indoor grow room can be as simple as a converted closet or small 2×2 space, or as advanced as a dedicated insulated basement grow room with climate controllers, dehumidifiers, and LED bars. No matter the size, the purpose stays the same: create a stable, predictable, optimized environment where cannabis plants can thrive without stress.
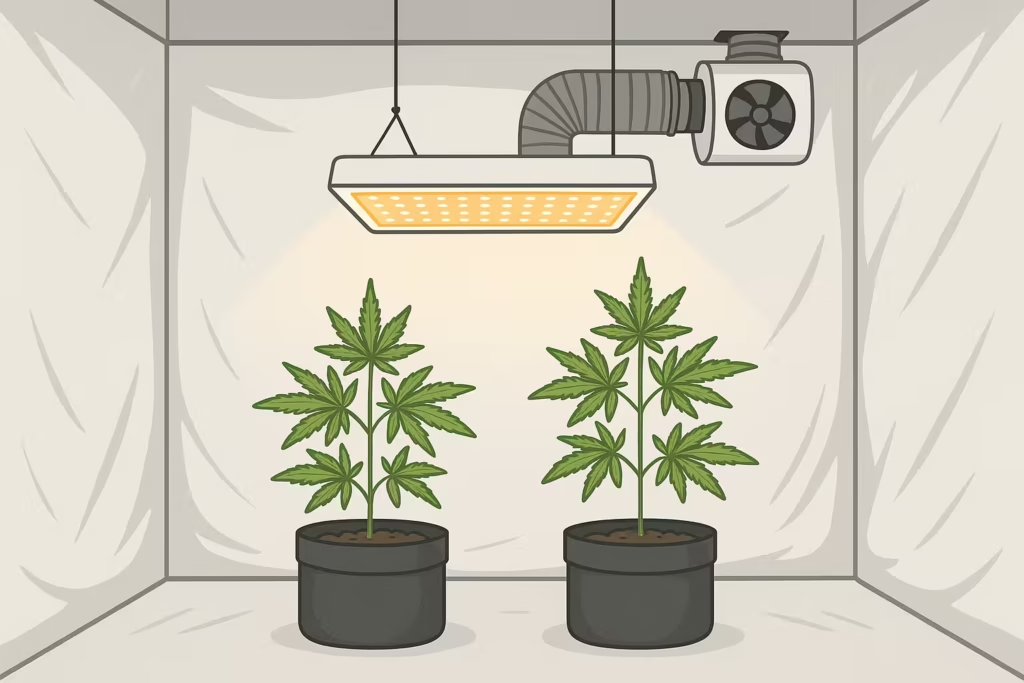
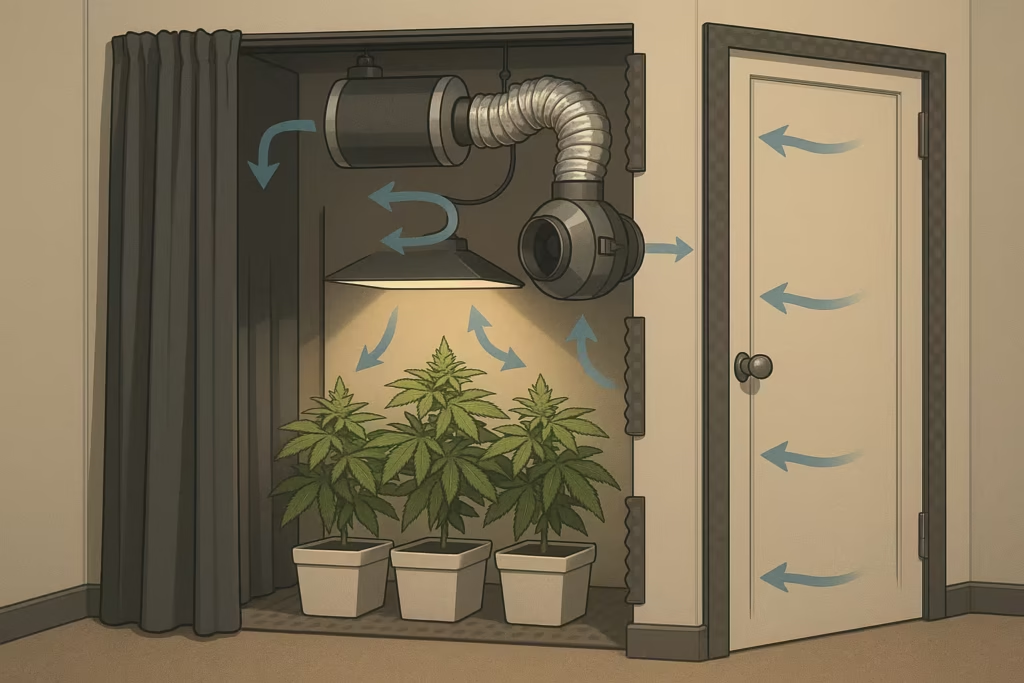
Inside a proper grow room setup, you control the entire micro-climate:
- Grow lights mimic the sun using adjustable spectrum LEDs.
- Ventilation systems manage air exchange, heat removal, and odor control.
- Humidity & temperature controls prevent mold, heat stress, and slow growth.
- Reflective walls maximize light efficiency and reduce energy waste.
- Environmental monitors help you maintain the ideal VPD zone for each stage.
This controlled grow environment allows you to produce bigger buds, stronger terpenes, richer resin production, and more consistent yields than most outdoor setups. Whether you’re a beginner working with a small indoor grow space or an experienced cultivator designing a full-scale room, the goal is simple: build a space where your cannabis plants get exactly what they need — no more, no less.
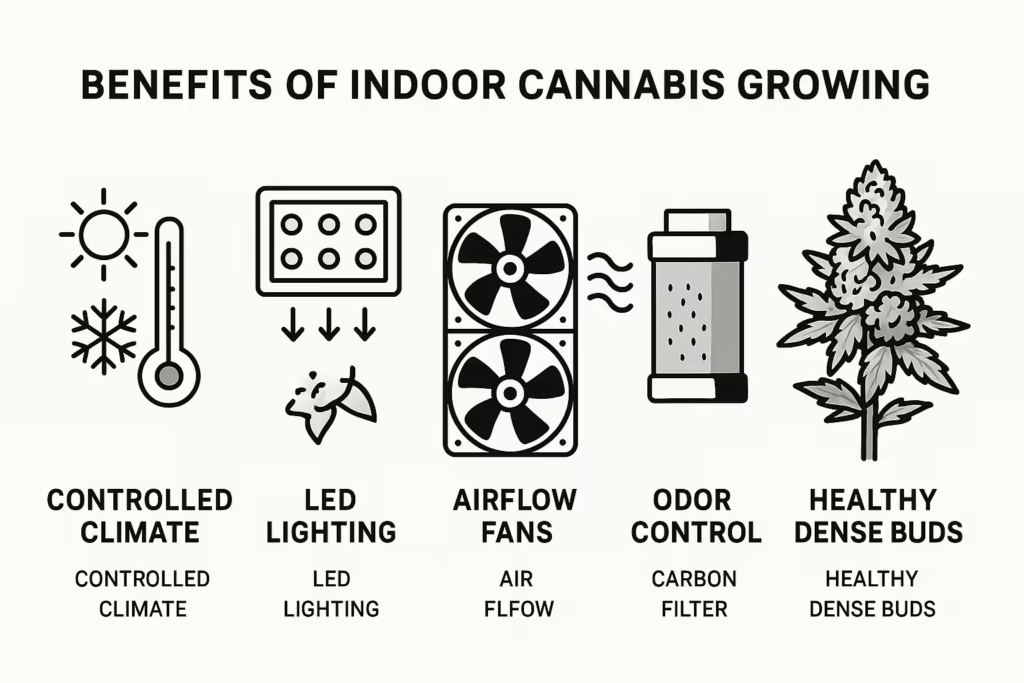
Benefits of an Indoor Grow Room
Growing cannabis in an indoor grow room gives you control, consistency, and total freedom over your plants’ environment. Instead of relying on unpredictable weather, harsh temperatures, pests, and seasonal changes, you create a customized micro-climate where your plants get exactly what they need to thrive. This is why indoor cultivation has become the go-to choice for growers who want premium-quality buds, high potency, and reliable harvests.
Year-Round Growing, No Weather Restrictions
With an indoor grow room, you’re not limited by the sun, seasons, or climate. You can run multiple harvest cycles per year because your plants live in a controlled environment:
- Grow anytime — summer, winter, monsoon, doesn’t matter.
- Maintain consistent light cycles (18/6 for veg, 12/12 for flower).
- Keep plants safe from excessive heat, frost, rain, and wind.
This gives you full independence as a grower — your grow room becomes your own indoor ecosystem.
Complete Climate Control for Higher Yields
The biggest advantage of an indoor grow room is the ability to manage your temperature, humidity, airflow, and VPD. Even small changes can affect your plants, so having control means:
- Faster, healthier veg growth
- Dense, resinous buds
- Zero environmental stress
- Optimal nutrient uptake
Better Pest & Mold Prevention
Outdoor gardens are open invitations for pests, mold, mildew, and pathogens. A proper indoor grow room dramatically reduces these risks:
- Controlled entry points
- Sterile growing environment
- Clean air intake
- Lower humidity during late flower
You eliminate many common grower headaches before they even start.
Stealth, Privacy & Odor Control
Indoor grow rooms offer natural stealth advantages, especially when using:
- Carbon filters to eliminate smell
- Silent inline fans
- Light-proofed rooms
- Sound-dampened ventilation
This makes indoor growing ideal for people who want a discreet, quiet, odor-free grow.
Optimized Light Distribution for Maximum Bud Quality
With LED grow lights or CMH/HPS fixtures, you control the intensity, spectrum, and duration of light — something impossible outdoors. This gives you:
- Stronger photoperiod control
- Higher trichome production
- Better terpene profiles
- More uniform canopy development
Indoor grow rooms deliver the perfect PPFD levels, which leads directly to bigger yields and denser buds.
Consistent, Repeatable Harvests
Indoor cultivation lets you fine-tune your grow so each harvest becomes more predictable and more productive. You learn your strain, dial in your environment, and replicate success every time.
Choosing the Right Space for an Indoor Grow Room
Before you hang a single LED or plug in an inline fan, the first step in building a successful indoor grow room is choosing the right space. Cannabis plants thrive when the environment is stable, quiet, and easy to control — so picking the perfect location makes everything else smoother, from climate management to pest prevention. Whether you’re working with a small closet grow, a spare bedroom, or a full basement grow room, your space will determine how efficiently your entire indoor setup performs.
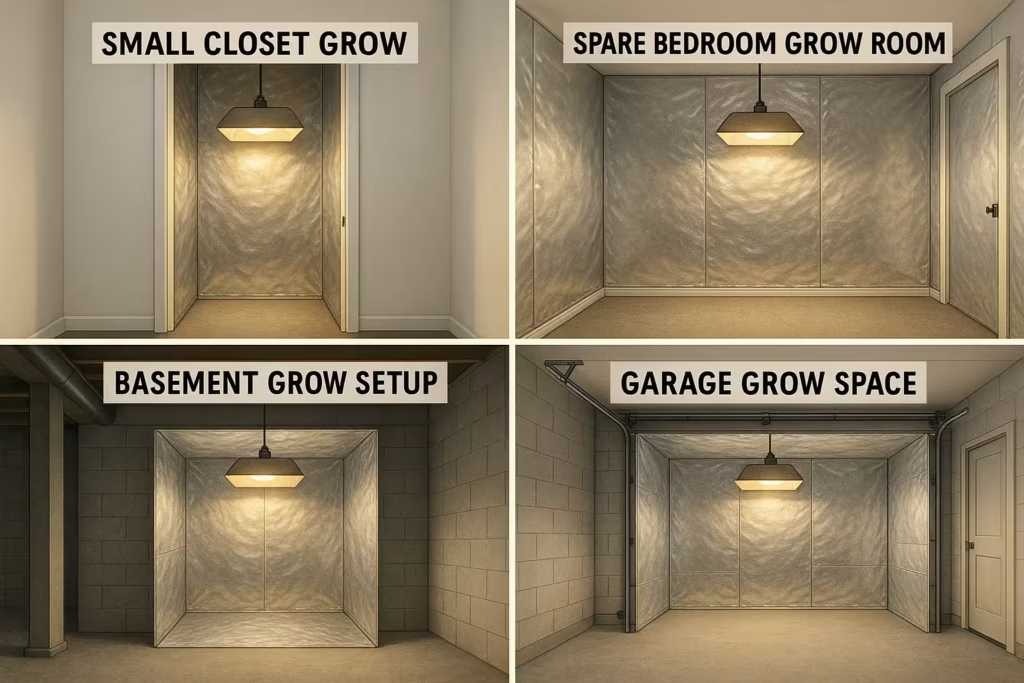
Look for a Space You Can Fully Control
An ideal grow room should let you manage temperature, humidity, light leaks, and airflow without fighting the room’s natural conditions. Spaces with good insulation are easier to maintain:
- Spare bedrooms
- Walk-in closets
- Basements and attics
- Garages
- Unused storage rooms
Consider the Size: 2×2, 3×3, 4×4, 5×5 & Beyond
Choose a space based on how many plants you want to grow and how much equipment you’ll be using.
- 2×2 ft — one small plant or autoflowers
- 3×3 ft — two medium plants, great for beginners
- 4×4 ft — four large photoperiod plants
- 5×5 ft — high-yield space for advanced indoor cultivation
Remember, plants need space to breathe, and your fans, filters, and ducting need room to operate without restrictions.
Ensure Good Ventilation & Airflow Pathways
Your grow room should have a clear route for fresh air intake and a clean path for exhaust, ideally with:
- Access to a window
- A spot to vent hot air outdoors
- Enough ceiling height for filters & light hangers
- Minimal air stagnation
Good airflow helps prevent mold, heat stress, and CO₂ depletion — three common issues indoor growers face.
Light-Proofing & Insulation Matter
Cannabis, especially photoperiod strains, is sensitive to light leaks during the flowering stage. Choose a space where you can easily:
- Seal windows
- Control outside light
- Maintain stable temperatures
- Reduce noise
Proper insulation also helps maintain consistent VPD, reduces AC and dehumidifier usage, and keeps your environment energy-efficient.
Avoid High-Traffic or High-Humidity Areas
Skip spaces where temperature swings or moisture levels fluctuate:
- Bathrooms
- Kitchens
- Laundry rooms
- Rooms exposed to sunlight or drafty windows
Cannabis plants prefer stability — and unpredictable rooms make climate control a full-time battle.
Think About Noise & Odor Management
Inline fans, carbon filters, and circulation fans all make noise. So choose a space where sound won’t be an issue. And always consider where the odor will go once flowering begins — stealth matters.
Essential Equipment for an Indoor Grow Room
A successful indoor grow room runs on the right gear. Your plants rely on you to create a stable micro-climate — with proper lighting, airflow, odor control, and environmental monitoring — so choosing the correct equipment is the foundation of every healthy cannabis harvest. Whether you’re building a small 2×2 setup or a full basement grow room, these are the must-have tools every indoor cultivator needs.
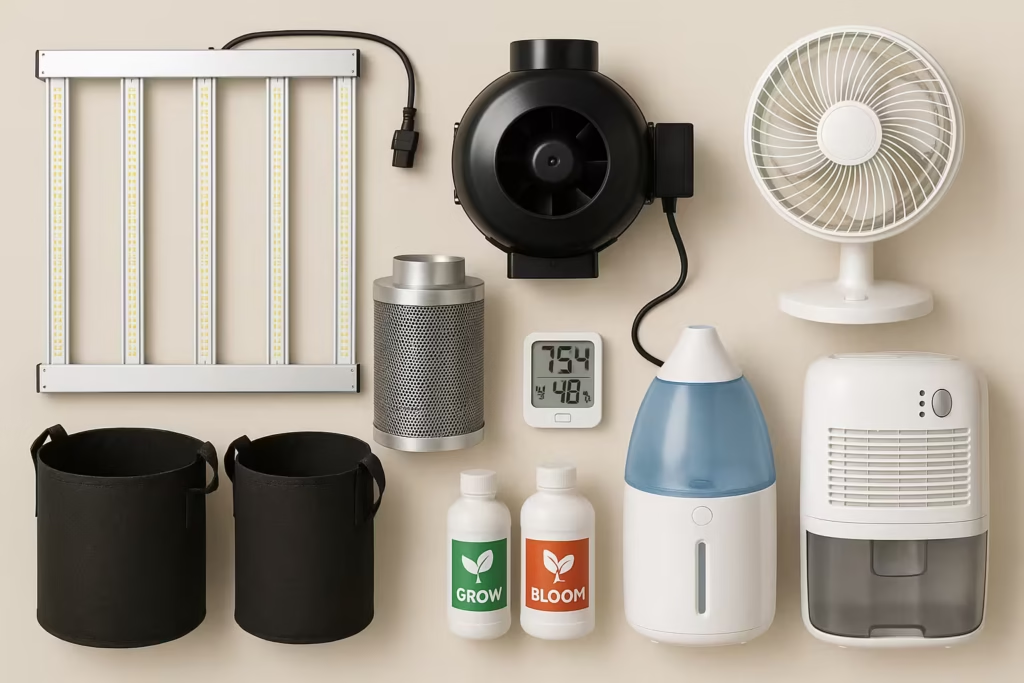
Grow Lights (LED, HPS, CMH) — The “Sun” of Your Indoor Garden
Your plants can’t thrive without strong, spectrum-rich light. Modern full-spectrum LED grow lights are the most popular because they run cooler, use less electricity, and deliver excellent PAR and PPFD levels. Still, some growers prefer HPS for flowering or CMH for vegetative growth.
What to look for:
- True wattage (not marketing watts)
- Balanced PPFD (600–900 for flower)
- Full-spectrum white LED bars
- Proper coverage for your grow room size
Ventilation System — Inline Fan, Ducting & Carbon Filter
Airflow is life inside a grow room. Cannabis plants need constant fresh air exchange to avoid heat pockets, high humidity, and CO₂ depletion. A proper ventilation system includes:
- Inline exhaust fan to remove hot, stale air
- Carbon filter to eliminate cannabis odor
- Ducting to direct airflow outside
- Intake vents or passive intake systems
This keeps your grow room cool, stealthy, and mold-free.
Climate Control Equipment — AC, Heater, Humidifier & Dehumidifier
Cannabis is picky when it comes to temperature and humidity. Too much humidity causes mold; too little slows growth. Hot rooms cause heat stress, and cold rooms stunt development.
Depending on your climate, you may need:
- Humidifier for seedlings
- Dehumidifier for late flower
- Portable AC to control heat from lights
- Heater in winter or cold basements
Dialing in the environment keeps your VPD in the ideal zone for strong, healthy growth.
Air Circulation Fans — Keep the Breeze Moving
A gentle, continuous breeze strengthens plant stems, prevents mold, and keeps microclimates from forming around the canopy. Use:
- Oscillating fans
- Clip-on fans
- Wall-mounted fans
Just don’t aim fans directly at young plants — you want airflow, not wind burn.
Environmental Monitors & Smart Controllers
Every indoor grower needs tools to track and automate their environment. This includes:
- Thermo-hygrometer (temp + humidity meter)
- Digital timers for light cycles
- Smart environmental controllers
- CO₂ monitors (optional for advanced growers)
These devices help you maintain consistent conditions and avoid silent grow room failures.
Grow Medium & Containers (Soil, Coco, Hydro)
Your grow medium affects nutrient absorption, watering frequency, and overall plant health. Choose what matches your experience level:
- Soil — easiest for beginners
- Coco coir — fast growth and great oxygenation
- Hydroponics — high-yield but more technical
Use fabric pots, air pots, or plastic containers depending on your watering style and airflow needs.
Safety & Electrical Setup — Don’t Skip This Step
Grow rooms use a lot of electrical power. Keep things safe with:
- Surge-protected power strips
- Waterproof extension cords
- Proper circuit load management
- Cable organization
- Elevated power sources (never on the floor)
Safety mistakes can ruin a grow faster than pests or mold.
Designing the Perfect Indoor Grow Room Layout
A well-designed indoor grow room layout can make the difference between struggling plants and a thriving cannabis garden that yields dense, frosty buds. Your layout controls how light spreads across the canopy, how air moves through the room, and how efficiently you can maintain temperature, humidity, and VPD. Whether you’re building a small grow room setup or a full professional indoor cultivation space, your layout determines how smoothly your entire grow will run.
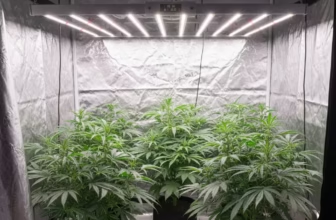
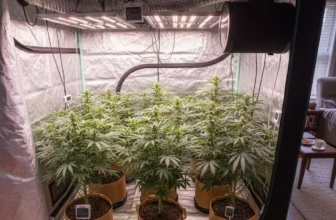
Small Grow Room Layouts: 2×2, 3×3, and 4×4 Setups
Small indoor spaces require smart placement of gear so plants get even light and airflow. These sizes are perfect for beginners or micro-growers:
2×2 Layout
- Best for 1 plant or autoflowers
- Use a compact 150–240W LED
- One small oscillating fan
- Carbon filter + inline fan mounted outside or above the space
3×3 Layout
- Ideal for 2 medium plants
- Use a 240–300W LED bar light
- One top fan + one bottom fan for cross-air circulation
- Carbon filter mounted at the top
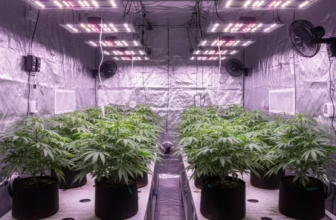
4×4 Layout
- Perfect for 3–4 photoperiod plants
- Use a 400–480W LED with even PPFD
- Add multiple circulation fans to prevent hotspots
Medium & Large Grow Room Layouts: 5×5 to 10×10 Spaces
Medium and large indoor rooms give you more space for plants, equipment, and airflow management.
5×5 Layout
- 4–6 large plants
- 600–700W LED or two 320W LEDs
- Separate intake and exhaust pathways
- Dehumidifier recommended during late flower
10×10 Layout
- Designed for multiple strains or small SOG setups
- Requires multiple LED fixtures for uniform PPFD
- Dedicated AC, dehumidifier, and CO₂ system optional
- Best airflow achieved with dual exhaust zones
These larger rooms allow serious growers to optimize light distribution, airflow, and canopy management for bigger yields.
Light Placement & Hanging Height Optimization
Light placement is the backbone of a good grow room design. Poor positioning causes stretching, light burn, or uneven canopy growth.
General light rules:
- Seedlings: 24–30 inches above canopy
- Vegging plants: 18–24 inches
- Flowering: 12–18 inches, depending on PPFD
- Keep lights centered over the canopy
- Use LED bar lights for uniform PPFD distribution
Always cross-check your fixture’s PPFD map to maximize photosynthesis without stressing your plants.
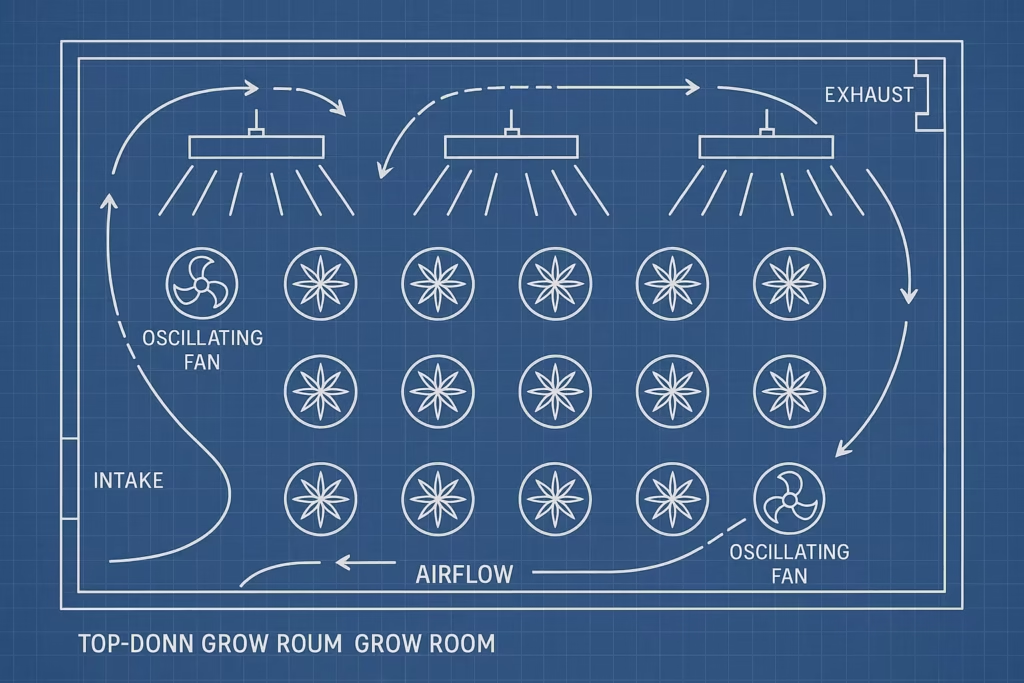
Airflow Mapping: Intake, Exhaust & Circulating Fans
A proper layout ensures steady airflow throughout the grow room. Your room should breathe just like your plants:
Airflow checklist:
- Fresh air intake near the bottom
- Exhaust fan + carbon filter mounted high (heat rises)
- Oscillating fans placed at different heights
- No direct wind on plants (prevents wind burn)
Your goal is to create a gentle, continuous breeze that eliminates hotspots, reduces humidity pockets, and strengthens stems.
Using Reflective Materials to Boost Light Efficiency
Reflective surfaces help maximize every watt of light and reduce energy waste.
Best options:
- Mylar (highly reflective)
- Panda film (black/white)
- Matte white paint
Reflective materials prevent dark corners, improve penetration, and help maintain consistent plant growth across the entire canopy.
Create Open Working Space for Easy Access
Many beginners overcrowd their rooms, making it hard to water, prune, or check for pests. Always leave:
- A little walking space
- Open access to the back plants
- Safe zones for wiring & equipment
A clean layout saves time and prevents accidents or plant damage.
Plan for Future Upgrades
A good layout shouldn’t just work today — it should scale with your growth as a gardener.
Leave room for future upgrades like:
- Extra LEDs
- CO₂ injection
- A larger dehumidifier
- Additional oscillating fans
- Propagation area for clones
This ensures your grow evolves as your skills improve.
Setting Up Your Indoor Grow Room Step-by-Step
Once you’ve chosen the right space and gathered your essential equipment, it’s time to actually build your indoor grow room. This is where your grow starts to come alive. The goal is simple: create a controlled, efficient environment where your cannabis plants get ideal light, airflow, temperature, and humidity from day one. Follow this step-by-step process to set up your grow room like a pro, whether you’re working with a 2×2 closet grow or a full basement cultivation room.
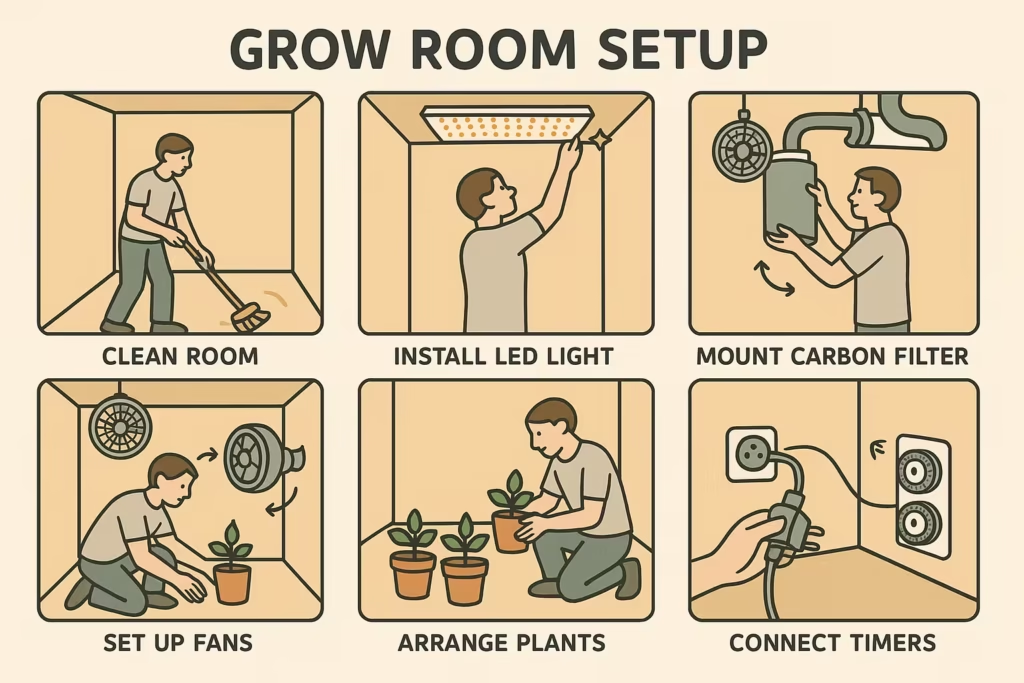
Step 1 — Prepare & Clean the Space
Before any equipment goes in, sterilize and prep your room to prevent pests, mold, and bacteria.
Key tasks:
- Wash walls, floors, and corners with mild bleach solution
- Seal cracks, light leaks, and gaps around windows
- Install reflective material (Mylar, Panda film, or matte white paint)
- Ensure the room is lightproof during the 12/12 flower cycle
- Set up waterproof floor trays if needed
A clean grow room creates a strong foundation for healthy crops.
Step 2 — Install the Grow Lights
Your grow lights are the “artificial sun” for your plants, so install them before any other equipment.
What to do:
- Mount LED bars or panels securely to the ceiling
- Make sure your light’s coverage matches your grow space (PAR map)
- Run dimmer cables or controllers for flexibility
- Adjust light height:
- Seedlings: 24–30 inches
- Veg: 18–24 inches
- Flower: 12–18 inches
Proper light installation ensures even PPFD distribution and prevents stretching or light burn.
Step 3 — Set Up Ventilation & Odor Control
Airflow is one of the most important factors in a functional grow room. Poor ventilation = weak plants, mold, and heat stress.
Ventilation checklist:
- Install the inline exhaust fan high in the room (heat rises)
- Connect ducting and vent air outside if possible
- Attach a carbon filter to remove cannabis odors
- Add a passive intake or filtered air intake vent
- Make sure there’s a clean path for air to move through the room
Your plants need a steady stream of fresh air and CO₂ — this step keeps your room breathing.
Step 4 — Dial In Climate Control & Monitoring Tools
Cannabis thrives when temperature and humidity are balanced to match each growth stage. A stable climate = fast growth, strong stems, resin-rich buds.
What to install:
- Thermo-hygrometers at canopy height
- Humidifier (for seedlings & early veg)
- Dehumidifier (for late flower)
- AC unit if your lights generate heat
- Heater if growing in winter or cold basements
- Set up light timers (18/6 veg, 12/12 flower)
- Install smart environmental controller (optional but powerful)
Keeping temperature in the ideal range (70–85°F depending on stage) helps your grow room maintain perfect VPD for explosive growth.
Step 5 — Position Your Plants & Choose Containers
Now that the environment is ready, it’s time to “move the girls in.”
Best practices:
- Use fabric pots or air pots for excellent root oxygenation
- Start plants on risers to avoid stagnant moisture
- Maintain even spacing so each plant gets:
- Good airflow
- Equal light intensity
- Access for pruning and watering
- Choose the right grow medium (soil, coco, hydro) based on experience
Remember: overcrowded grow rooms lead to humidity problems and airflow blockages.
Step 6 — Set Up Irrigation or Watering Routine
Whether you’re hand-watering or running an automated system, your irrigation setup must prevent overwatering and nutrient lockout.
Irrigation options:
- Hand watering (easy for beginners)
- Drip irrigation for consistent moisture levels
- Reservoir + pump for hydro or coco
- Use trays to catch runoff and monitor EC if you’re feeding nutrients
Make sure drainage is clean, controlled, and never stagnant.
Step 7 — Test Everything Before Planting
Never put plants into a room you haven’t tested.
Test checklist:
- Run lights for 1–2 hours → check heat levels
- Run inline fan → confirm negative pressure & odor control
- Test oscillating fans → ensure no direct wind burn
- Check humidity stability with humidifier/dehumidifier
- Verify dark period is 100% light-proof
- Confirm timers switch on/off correctly
A “trial run” prevents surprises once your plants are inside.
Step 8 — Add the Plants & Start Your Grow
Once everything is stable:
- Place your plants
- Monitor daily for the first week
- Keep notes on climate changes
- Begin light veg feeding
- Adjust fan speeds and light height as needed
Temperature, Humidity & VPD for Indoor Grow Rooms
Dialing in the right temperature, humidity, and VPD (Vapor Pressure Deficit) is one of the biggest keys to running a successful indoor grow room. Cannabis is a climate-sensitive plant, and even small shifts in heat or moisture can affect nutrient uptake, terpene development, and your final yield. When your environment is balanced, your plants grow faster, stay healthier, and produce heavier, frostier buds.
Think of it like this:
Lights grow plants… but temperature, humidity, and VPD determine how well they can breathe, feed, and recover.
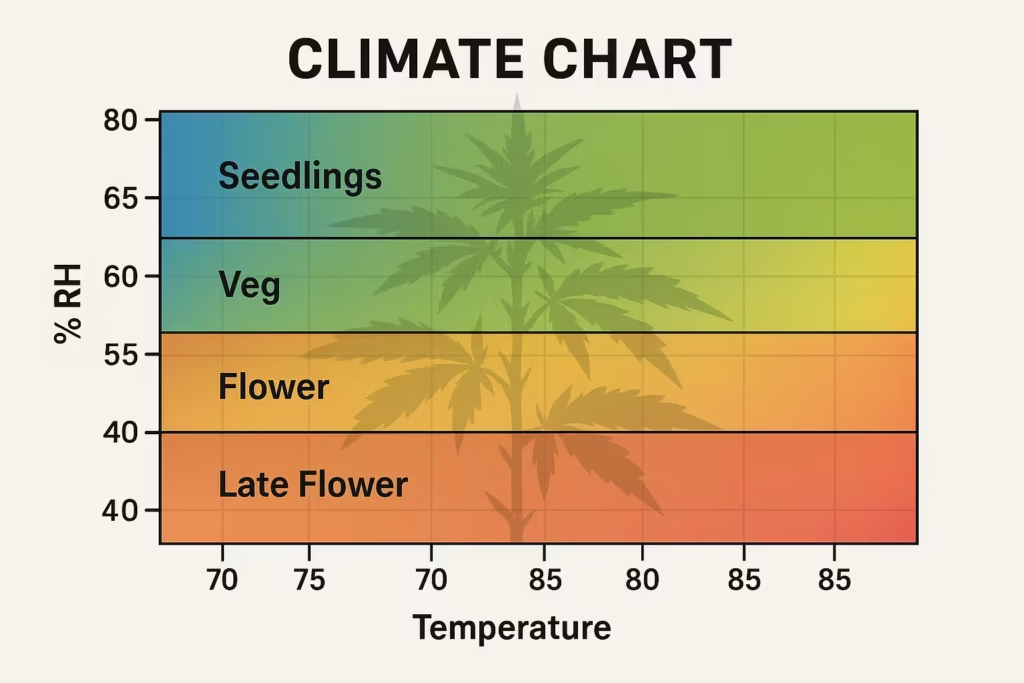
Ideal Temperature Range for Each Growth Stage
Cannabis prefers warm days and slightly cooler nights. When temperatures stay in the optimal range, plants maintain strong metabolism, healthy transpiration rates, and efficient photosynthesis.
Seedlings:
- 70–78°F (21–25°C)
Young plants like mild warmth and a stable environment.
Vegetative Stage:
- 72–82°F (22–28°C)
Warm temps encourage rapid leaf and root development.
Flowering Stage:
- 68–78°F (20–25°C)
Slightly cooler temps preserve terpenes and avoid heat stress.
Late Flowering:
- 65–75°F (18–24°C)
Lower temperatures tighten buds and help reduce humidity levels.
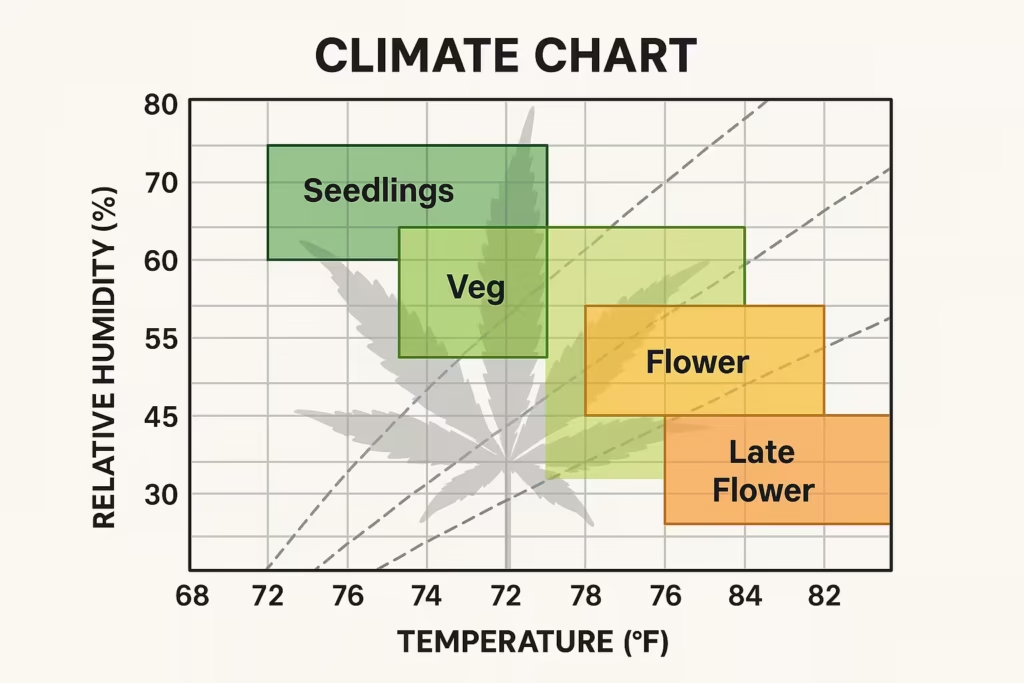
Humidity Levels for Each Stage of Growth
Humidity affects how your plants release moisture through their leaves. Too high = mold. Too low = stress and slow growth. Keeping humidity balanced is crucial for avoiding powdery mildew and bud rot.
Seedlings:
- 60–70% RH
The high humidity helps fragile roots establish.
Vegetative Stage:
- 50–60% RH
Leaves transpire efficiently and plants grow rapidly.
Flowering Stage:
- 40–50% RH
Lower humidity prevents mold on forming buds.
Late Flowering:
- 35–45% RH
This protects dense colas from moisture-related issues.
Understanding VPD (Vapor Pressure Deficit)
VPD is the difference between the moisture in the air and the moisture inside the plant leaf. It controls how well cannabis plants drink water, absorb nutrients, and breathe.
Why VPD Matters:
- Low VPD = plants can’t transpire properly
- High VPD = plants lose water too fast
- Perfect VPD = explosive growth and thick, resinous buds
When temperature and humidity are tuned correctly, your plants hit the ideal VPD zone, which leads to:
- Faster nutrient uptake
- Stronger stems
- Better terpene production
- Improved THC and resin development
Simplified VPD Targets:
- Seedlings: 0.4 – 0.8 kPa
- Veg: 0.8 – 1.2 kPa
- Flower: 1.2 – 1.6 kPa
Tools You Need to Maintain Ideal Climate
To keep temperature, humidity, and VPD stable inside your indoor grow room, you’ll need:
- Thermo-hygrometers (place 1 at canopy height)
- Humidifier for seedlings & veg
- Dehumidifier for flowering
- AC unit for heat management
- Heater for cold basements or winter grows
- Oscillating fans for even air movement
- Exhaust fan + carbon filter to remove heat & moisture
Smart growers use VPD calculators or digital controllers that automatically adjust equipment.
Tips for Maintaining Perfect VPD All Grow Long
- Keep sensors at canopy level for accurate readings
- Reduce humidity gradually as plants move toward flower
- Increase airflow during late flower when buds get dense
- Avoid wide temperature swings between day and night
- Use a dehumidifier + exhaust combo during lights off
- If running high-intensity LEDs, expect more heat removal
Light Cycles for Indoor Grow Rooms
Light cycles are the heartbeat of your entire indoor grow room. Cannabis plants rely on specific light and dark periods to know when to grow leaves, when to stretch, and when to start producing buds. In an indoor environment, you become the sun — and controlling your light cycle properly is the key to strong veg growth, explosive flowering, and healthy, predictable yields.

The right light schedule prevents stress, keeps your plants in the correct growth stage, and ensures optimal photosynthesis. Whether you’re growing photoperiod strains or autoflowers, dialing in the proper light cycle is essential for success.
Vegetative Light Cycle (18/6 or 20/4)
During the vegetative stage, cannabis needs long hours of light to fuel rapid growth. Most growers choose:
18 hours of light / 6 hours of darkness (18/6)
This is the classic veg cycle — efficient and balanced.
20 hours of light / 4 hours of darkness (20/4)
Used by growers who want faster veg growth and tighter internodes.
Why long light hours?
- Encourages vigorous growth
- Produces strong stems and branches
- Promotes rapid root expansion
- Helps plants prepare for heavy buds later
Flowering Light Cycle (12/12)
For photoperiod cannabis strains, flowering begins when you switch your lights to:
12 hours of light / 12 hours of darkness (12/12)
This mimics fall daylight hours, signaling the plant to stop growing leaves and start producing buds, resin, terpenes, and cannabinoids.
Why 12/12 works:
- Tells the plant to transition from veg to bloom
- Stabilizes hormone levels
- Produces dense, resin-rich colas
- Ensures full flowering development
Maintaining complete darkness during the 12-hour dark period is critical. Any light leaks can cause:
- Hermaphroditism
- Flowering delays
- Lower yields
Light Cycle for Autoflowers
Autoflowering strains don’t depend on light cycles to trigger flowering. They bloom automatically based on age.
Recommended cycles include:
- 18/6
- 20/4
- 24/0 (for some growers)
Autoflowers benefit from extended light hours because they grow and flower at the same time, giving them more energy to build buds.
Choosing the Best Light Schedule for Your Grow Room
Your choice depends on your goals:
Lower electricity bills:
- Use 18/6 for veg
- Maintain stable temperatures at night
Faster veg and bigger plants:
- Use 20/4
Running photoperiods:
- Always switch to 12/12 for flowering
Running autoflowers:
- Keep 18–20 hours of light throughout the entire grow
Using Timers & Smart Controllers for Accuracy
Consistent light cycles prevent stress and improve yield quality. Use:
- Digital timers
- Smart WiFi timers
- Grow light controllers
These tools automate your light schedule and prevent accidental disruptions that can confuse your plants.
Odor Management & Stealth Growing
One thing every indoor grower learns fast: cannabis plants smell — a lot. As soon as your girls hit late veg and start stacking flowers, the aroma gets loud, sticky, and unmistakable. That’s why proper odor control and stealth grow techniques are critical for any indoor grow room, whether you’re cultivating in a closet, spare bedroom, or basement. A well-built stealth grow keeps your home smelling clean, quiet, and discreet while still letting your plants thrive.
Managing cannabis odor is all about controlling airflow, filtration, and positive/negative pressure inside the grow space. When done right, even a fully packed flowering room can stay completely scent-free.
Carbon Filters Are the Heart of Odor Control
A carbon filter (also called an activated charcoal filter) is the most effective way to eliminate cannabis smell. It scrubs the air before it leaves the grow room, trapping aromatic terpenes and keeping your entire home odor-free.
Why carbon filters work so well:
- Removes 90–99% of cannabis odor
- Lasts 12–24 months
- Works with any inline fan
- Essential during the flowering stage
Pro Tips:
- Always place the carbon filter inside the grow room
- Pair it with a strong inline exhaust fan
- Ensure airtight ducting for proper negative pressure
Creating Negative Pressure for True Stealth
Negative pressure means more air is being pulled out of the grow room than pushed in. This ensures all smell gets sucked through your carbon filter before escaping anywhere else.
How to know your room has negative pressure:
- Walls of your grow tent slightly pull inward
- Airflow always exits through the exhaust
- Zero odor leaks
Negative pressure is the foundation of a stealth grow room, especially in apartments or shared homes.
Inline Fans & Ducting for Proper Airflow
Your inline fan is what actually pulls air through the carbon filter. Without good airflow, even the best filter won’t eliminate odor effectively.
Choose an inline fan based on:
- Grow room size (CFM rating)
- Length of ducting runs
- Heat from your grow lights
Keep your ducting tight, straight, and sealed to maximize stealth and efficiency.
Odor-Reducing Add-Ons (Optional but Helpful)
Sometimes growers need extra odor control, especially during late flower. You can add:
- ONA gel (USE ONLY outside the grow room)
- Scent-neutralizing sprays for room exteriors
- HEPA air purifiers for high-traffic areas
- Odor-absorbing bags near the intake area
These don’t replace a carbon filter, but they help keep the environment extra discreet.
Sound-Proofing for Maximum Stealth
Stealth isn’t only about smell — it’s about silence too. Inline fans, oscillating fans, and ducting can make noticeable noise.
Sound-dampening tips:
- Use insulated ducting
- Install rubber mounts on fans
- Place fans on foam pads
- Run fans at lower speeds with a controller
- Keep equipment off walls to avoid vibration noise
A silent grow room is a stealthy grow room.
Light-Proof & Leak-Proof for Total Discretion
Light leaks can draw attention, especially at night. Stealth growers always:
- Seal cracks and gaps with weatherstripping
- Use blackout curtains for nearby windows
- Tape light leaks around tent zippers
- Keep the grow room fully dark during “lights off” cycles
This not only protects privacy but keeps your plants safe from stress and hermaphroditism.
Stealth Tips for Living in Apartments or Shared Homes
If you grow in a place where stealth really matters, follow these key tips:
- Run ventilation during non-sleep hours
- Keep the grow room door locked
- Store nutrients and equipment discreetly
- Avoid venting into shared hallways
- Place a HEPA filter in the living area
- Use scent-neutral laundry detergents nearby
Stealth is about blending in — not giving anyone a reason to look twice.
The Goal: Strong Buds, Zero Smell
With a solid odor management system and stealth setup, you’ll be able to grow loud, terpene-packed cannabis while keeping your home completely scent-free and private.
Common Indoor Grow Room Mistakes to Avoid
Even with the best equipment and the perfect indoor grow room layout, small mistakes can quickly snowball into weak plants, slow growth, pest issues, and disappointing yields. The truth is, cannabis is a resilient plant — but the indoor environment is not forgiving. One bad decision with airflow, lighting, humidity, or spacing can cause problems that take weeks to fix. Knowing what to avoid helps you grow healthier plants and maintain a stable, productive grow room from day one.
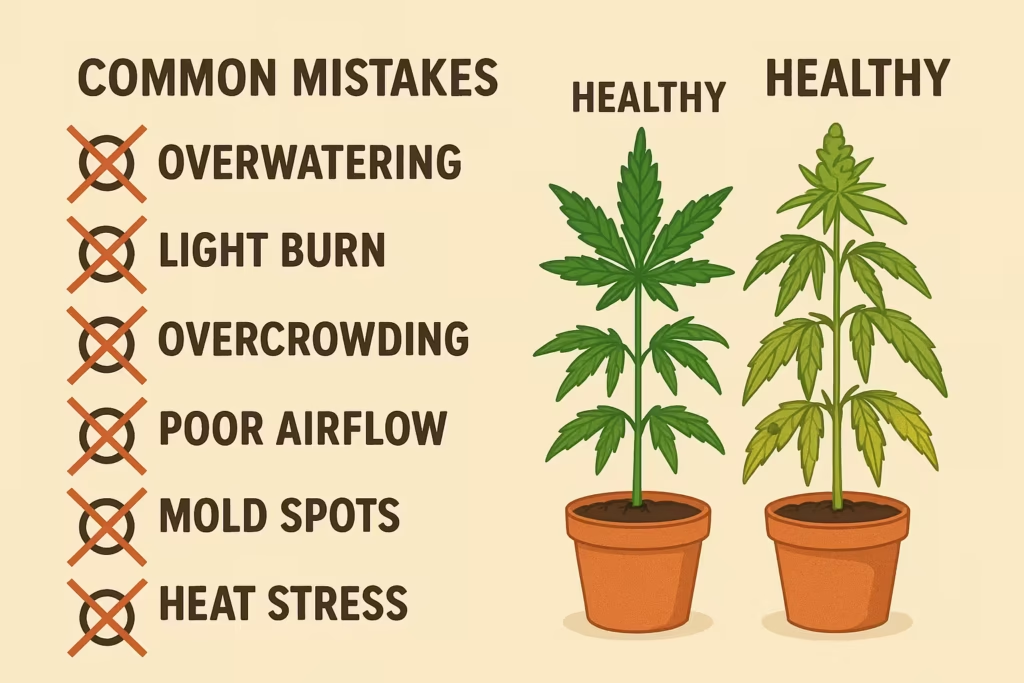
Below are the most common indoor grow room mistakes new growers make — and how to avoid them like a seasoned cultivator.
Mistake #1 — Poor Airflow & Stagnant Air
A grow room without strong, directional air movement becomes a breeding ground for mold, powdery mildew, pests, and heat pockets. Cannabis needs fresh air to grow properly.
How to avoid this:
- Run oscillating fans at different heights
- Maintain strong exhaust airflow with a quality inline fan
- Ensure clean air intake at the bottom
- Avoid pointing fans directly at plants (prevents wind burn)
Mistake #2 — Overwatering & Poor Drainage
Overwatering is one of the top causes of slow growth and root rot in indoor grows. Cannabis prefers a wet-dry cycle.
Avoid it by:
- Using fabric pots for better root oxygenation
- Ensuring pots drain well and runoff is removed
- Lifting pots to check if they’re heavy before watering
- Letting the top inch of soil dry out between waterings
Mistake #3 — Incorrect Light Distance or Intensity
Too much light = leaf burn.
Too little light = stretching and weak growth.
Fix it by:
- Following PPFD maps from your LED manufacturer
- Using dimmers during early growth
- Maintaining proper LED height:
- Seedlings: 24–30 in
- Veg: 18–24 in
- Flower: 12–18 in
Mistake #4 — Ignoring Temperature & Humidity Control
Many beginners lose yield due to fluctuating climate conditions. Cannabis needs stable temperature and RH to maintain proper VPD.
To avoid this:
- Monitor with a digital thermo-hygrometer
- Use a humidifier for seedlings & veg
- Use a dehumidifier for late flower
- Keep temperatures consistent day/night
Mistake #5 — Overcrowding the Grow Room
Putting too many plants in a small space might look appealing at first, but it quickly turns into a climate disaster.
Why it’s bad:
- Increased humidity trapped between plants
- Reduced airflow causing mold risk
- Uneven light penetration
- Hard to water, prune, or inspect plants
Stick to recommended plant counts for your space (2×2, 3×3, 4×4, etc.).
Mistake #6 — Not Controlling Odor Properly
A weak odor-control system can lead to unwanted attention. Many beginners think their plants won’t smell until late flower — wrong. Terpenes ramp up earlier than expected.
Avoid this by using:
- A carbon filter + inline fan
- Negative pressure
- Proper ducting and sealed connections
Mistake #7 — No pH Monitoring of Water & Nutrients
Indoor growers must monitor pH to ensure proper nutrient uptake. Incorrect pH leads to nutrient lockout, yellowing leaves, and slow growth.
Fix it by:
- Using a digital pH meter
- Keeping pH between 6.0–7.0 for soil
- Keeping pH between 5.5–6.5 for coco/hydro
- Checking runoff pH regularly
Mistake #8 — Not Making the Room Light-Proof
Photoperiod plants require absolute darkness during flower. Light leaks can delay flowering or cause hermaphrodites.
Avoid this by:
- Sealing door gaps
- Covering window edges
- Checking for pinhole leaks
- Using blackout curtains or tape if needed
Mistake #9 — Using Cheap or Underpowered Equipment
Weak lights, weak fans, or cheap filters cause more problems than they solve. Investing in proper gear saves time, money, and stress in the long run.
Mistake #10 — Skipping Daily Checks
Indoor grow rooms change fast — temperature spikes, humidity drops, clogged fans, or light timer glitches can ruin a grow overnight.
Daily checks include:
- Temperature & humidity
- Light cycle consistency
- Leaf health
- Nutrient levels
- Airflow direction
- Odor control performance
Staying consistent helps you catch issues early.
🌿 Final Thought
Avoiding these mistakes puts you far ahead of the average beginner. Indoor growing is about building a stable, predictable environment — and once you master that, the buds will speak for themselves, brother.
Cost Breakdown: How Much Does an Indoor Grow Room Cost?
Building an indoor grow room doesn’t have to drain your wallet, but it also isn’t free. The exact cost depends on your grow room size, equipment quality, and whether you’re aiming for a budget setup, mid-range build, or a full professional grow room. New growers often underestimate expenses, especially for lighting, ventilation, and climate control — the three pillars of a healthy and productive indoor cannabis garden.
In this section, we’ll break down realistic indoor grow room costs so you know exactly what to expect before you start planting your first seed.
Small Indoor Grow Room Cost (2×2 or 2×4 Space)
Perfect for beginners, micro-growers, and small home grows.
Typical equipment costs:
- LED grow light: $80–$180
- Inline fan + carbon filter: $70–$150
- Oscillating fan: $15–$30
- Grow medium + pots: $20–$40
- Thermo-hygrometer: $10–$20
- Basic nutrients: $20–$40
- Timer + extension cords: $10–$25
Total Cost: $225–$485
Great budget setup with everything needed to grow 1–2 healthy plants indoors.
Medium Indoor Grow Room Cost (3×3 or 4×4 Space)
This is the sweet spot for most home growers who want strong yields without going commercial.
Equipment costs:
- High-quality LED light: $250–$500
- Inline fan + carbon filter: $100–$200
- Dehumidifier (optional but recommended): $50–$150
- Humidifier (for seedlings/veg): $25–$60
- Oscillating fans (2–3): $30–$90
- Grow medium + pots: $30–$60
- Nutrients + pH kit: $40–$70
- Environmental monitor: $15–$40
Total Cost: $540–$1,170
Ideal for growers who want 2–4 plants with big yields and controlled climate.
Large Indoor Grow Room Cost (5×5 to 10×10 Setup)
For advanced growers, caregivers, or multi-strain growers building a serious indoor grow room.
Equipment needed:
- Multiple LED bar fixtures: $600–$1,500+
- High-capacity inline exhaust system: $150–$300
- Large dehumidifier: $150–$300
- Portable AC (depending on climate): $250–$600
- Oscillating fans (4–6): $60–$180
- CO₂ system (optional): $200–$500
- Nutrients & medium: $60–$120
- Environmental controllers: $80–$300
Total Cost: $1,550–$3,500+
Professional-level grow room capable of supporting 6–12 plants with complete climate control.
Monthly Electricity Cost for an Indoor Grow Room
The ongoing cost depends mostly on:
- Grow light wattage
- How long lights stay on (18/6, 20/4, 12/12)
- Ventilation system power
- AC/dehumidifier usage
Average electricity costs:
- Small grow room: $20–$40 per month
- Medium grow room: $40–$90 per month
- Large grow room: $90–$200 per month
LEDs significantly reduce monthly bills compared to HPS lights.
Other Hidden Costs New Growers Forget
- Replacement carbon filters (every 12–18 months)
- Extra nutrients or additives
- Sticky traps or pest controls
- Replacement fans
- Water filters or RO systems
- Additional pots for transplanting
These small items add up, so it’s good to budget an extra $50–$150 per grow cycle.
Budget vs Mid-Range vs Premium Grow Rooms
Budget Setup:
- Uses basic LED lights, small fans, and minimal climate tools
- Good for new growers on a tight budget
Mid-Range Setup:
- Balanced performance + reliability
- Best value for long-term growing
Premium Setup:
- Professional LED bars, automated controllers, full environmental automation
- Highest yields and best-quality buds
🌿 Final Cost Summary
If you’re wondering, “How much does it cost to start an indoor grow room?” — here’s the quick answer:
- Beginner (2×2): $225–$485
- Serious Home Grower (4×4): $540–$1,170
- Advanced/Professional (5×5+): $1,550–$3,500+
- Monthly Electricity: $20–$200
A well-built grow room pays for itself quickly through high-quality, homegrown cannabis that beats dispensary prices any day.
Indoor Grow Room Checklist (Beginner-Friendly)
Building your first indoor grow room can feel overwhelming — there are lights, fans, filters, timers, nutrients, and a whole bunch of climate gear to manage. That’s why having a simple, beginner-friendly checklist makes everything easier. This is the exact checklist new growers should follow before planting their first seed, ensuring they have all the essential tools for a smooth, stress-free grow.
Use this checklist as your master reference to build a stable, efficient cannabis grow room from day one.
1. Grow Room Structure & Preparation
- ✔ Clean, disinfected space
- ✔ Light-proofed room (no leaks during 12/12)
- ✔ Reflective surfaces installed (Mylar / Panda film / matte white paint)
- ✔ Sealed cracks, gaps, and air leaks
- ✔ Waterproof floor tray or spill protection
- ✔ Easy access for watering and plant inspection
2. Lighting Essentials
- ✔ Full-spectrum LED grow light (match wattage to room size)
- ✔ Adjustable light hangers or ratchet pulleys
- ✔ Dimmer or controller (recommended for veg/flower transitions)
- ✔ PAR/PPFD map reference for proper height
3. Ventilation & Airflow System
- ✔ Inline exhaust fan (proper CFM rating for room size)
- ✔ Activated carbon filter for odor control
- ✔ Flexible ducting (insulated for stealth)
- ✔ Oscillating fans for canopy airflow
- ✔ Passive or active air intake
- ✔ Negative pressure test to confirm no odor leaks
4. Climate Control Tools
- ✔ Digital thermo-hygrometer (place at canopy level)
- ✔ Humidifier for seedlings/veg
- ✔ Dehumidifier for flowering
- ✔ Portable AC or heater if needed
- ✔ Smart environmental controller (optional but powerful)
5. Containers & Growing Medium
- ✔ Fabric pots, air pots, or plastic containers
- ✔ Soil, coco coir, or hydro medium
- ✔ Saucers or trays for runoff
- ✔ Root support risers (optional)
6. Watering & Feeding Gear
- ✔ Watering can or pump sprayer
- ✔ pH meter (digital preferred)
- ✔ EC/TDS meter (for nutrient strength)
- ✔ Nutrient kit (base nutrients: Grow, Micro, Bloom)
- ✔ Measuring syringe, pipettes, or ml cups
- ✔ Clean water source (RO or filtered recommended)
7. Seedling/Propagation Supplies
- ✔ Seedling tray or starter cubes
- ✔ Humidity dome
- ✔ Low-intensity LED seedling light
- ✔ Heat mat (optional for cold climates)
8. Safety & Electrical Setup
- ✔ Surge-protected power strips
- ✔ Waterproof extension cords
- ✔ Cord management to prevent tripping
- ✔ Proper circuit load (avoid overloading outlets)
- ✔ Elevate electrical items above floor level
9. Pest Prevention & Cleanliness
- ✔ Sticky traps (yellow/blue)
- ✔ Neem oil or organic pest spray
- ✔ Alcohol wipes for quick cleaning
- ✔ Clean shoes/clothes when entering the grow room
10. Monitoring & Daily Maintenance Tools
- ✔ Daily logbook or grow journal
- ✔ Timer for lights
- ✔ Smartphone app for tracking (optional)
- ✔ Extra thermometer for cross-checking climate
- ✔ Backup fan or spare filter
==> Indoor Grown Cannabis – Complete Guide for Growers.
FAQs
A 2×2 or 3×3 grow room is perfect for beginners. It’s small enough to manage easily but large enough to grow 1–3 cannabis plants with proper airflow, lighting, and humidity control.
Here’s a simple guideline:
1. 2×2: 1 plant
2. 3×3: 2 plants
3. 4×4: 3–4 plants
Too many plants cause humidity buildup, poor airflow, and uneven light distribution.
Match light wattage and PPFD to your space:
1. 2×2: 150–240W LED
2. 3×3: 240–350W LED
3. 4×4: 400–480W LED
4. 5×5: 600–800W LED
Aim for 600–900 PPFD in flower for strong, dense buds.
Yes. Even a tiny indoor grow room needs proper airflow. You need:
1. Inline exhaust fan
2. Carbon filter
3. Air intake
4. Oscillating fans
Good ventilation prevents heat stress, CO₂ depletion, mold, and strong odor.
Use an activated carbon filter connected to your inline fan. Maintain negative pressure and seal leaks in your room. Optional add-ons include ONA gel, air purifiers, and insulated ducting (outside the grow, never inside).
1. Veg: 72–82°F (22–28°C)
2. Flower: 68–78°F (20–25°C)
Keep nighttime temps only 5–10°F lower to avoid stress.
1. Seedlings: 60–70% RH
2. Veg: 50–60% RH
3. Flower: 40–50% RH
4. Late flower: 35–45% RH
This prevents mold while maintaining healthy transpiration.
Depending on light size and climate tools:
1. Small grow room: $20–$40
2. Medium grow room: $40–$90
3. Large grow room: $90–$200
LEDs drastically reduce electricity usage.
CO₂ is optional, not required. For beginners, fresh air exchange is enough. CO₂ helps only when:
1. Light intensity is very high (900+ PPFD)
2. Climate is stable
3. Plants have strong airflow
Both work great indoors:
1. Photoperiods: Bigger yields, more control, requires 12/12 light cycle
2. Autoflowers: Faster grow time, easier for beginners, no light cycle changes
Choose based on your experience and schedule.
Yes, but only after re-amending and sterilizing it. Spent soil needs new nutrients and aeration material (like perlite). Many growers prefer fresh soil to avoid pests and nutrient imbalances.
1. Use sticky traps
2. Keep the room clean
3. Avoid bringing outdoor plants/clothes inside
4. Maintain negative pressure
5. Quarantine new clones
Automation is optional but extremely helpful. Timers, smart controllers, and auto-watering systems make your grow more stable and beginner-friendly.
Every single day, brother. Even with automation, check:
1. Temperature & humidity
2. Light cycle
3. Odor control
4. Leaf health
5. Airflow
Consistent monitoring prevents small problems from becoming big disasters.
Conclusion
Setting up an indoor grow room is one of the smartest moves a cannabis grower can make. When you grow indoors, you take full control over the entire environment — from lighting and airflow to temperature, humidity, and VPD. With the right equipment, a clean layout, and a stable climate, your plants can thrive year-round and deliver dense, resin-rich buds that rival or outperform dispensary-quality flower.
Indoor cultivation is all about consistency. When your room stays dialed in — proper PPFD levels, steady airflow, balanced RH, strong odor control, and daily maintenance — your plants reward you with healthier growth, bigger yields, stronger terpenes, and richer flavors. Whether you’re working with a small 2×2 space, a medium 4×4 grow room, or a full-size indoor garden, the techniques remain the same: create a stable micro-climate, avoid common mistakes, and give your plants the clean, fresh environment they deserve.
By following the steps, checklists, and best practices in this guide, you’re setting yourself up for long-term success as an indoor grower. Every grow will get easier, your harvests will get heavier, and your confidence as a cannabis cultivator will grow right along with your plants.
References and Sources:
- Leafly – Cannabis Growing Basics
- ScienceDirect – Environmental Control & Plant Physiology
- Fluence Bioengineering – Cannabis Lighting Research Articles
- Purdue University – Light Quality & Photosynthesis
- Can-Filters Technical Specs (Stable Documentation Page)
- University of Arizona – Controlled Environment Agriculture Center
- NC State University – Controlled Environment & Greenhouse Management
- Grow Weed Easy – Complete Grow Room Tutorials
- Ed Rosenthal’s Official Website (Industry Standard)
- Jorge Cervantes – Official Guides & Resources